Voigtlander Revisited

Some years ago I was doing a lot of architectural photography and bought a Voigtlander Bessa R4A camera with 15mm and 21mm lenses. Earlier in this blog I wrote an appreciation of  this setup and I’m including the introduction to the Cosina rangefinder cameras and lenses below.

“Voigtlander is known as an optical company founded in 1756 in Vienna and created photographic products from 1840, moving to Germany in 1849. In the 20th Century it produced many important cameras and lenses becoming part of the Zeiss organisation in 1965. When Zeiss ceased production of cameras in 1972 it sold Voigtlander to Rollei which in its turn ceased trading in 1982 after which the brand name was acquired by a German marketing company. In 1999 the Voigtlander brand was licensed to Cosina Company.

Cosina is an optical and photographic company that was formed in 1959 as a lens manufacturer mainly as subcontractor for better known brands. From the 1970s it has been making cameras for Argus, Contax, Nikon, Olympus, Vivitar and Yashica as well as under its own name. In 1999 the Voigtlander brand was re-born with the Bessa L a rangefinder camera with the Leica LTM screw mount. The current range is the Bessa R with the Leica M bayonet mount of which the models are R2 with framelines for 35, 50, 75 and 90 mm, R3 with 1:1 magnification and framelines for 40, 50, 75 and 90 mm and R4 with framelines for 21, 25, 28, 35 and 50 mm. Each model is produced in M (manual) and A (automatic) form. The M cameras are mechanical with a match-LED exposure meter and the A cameras set the ahutter speed automatically depending on the aperture thus requiring batteries to function. Since 1999 Cosina Voigtlander (“CV”) has produced many lenses for the LTM and M mount as well as for Nikon and Pentax and makes (amongst other lenses) the Zeiss M and Z ranges and the recent Zeiss Touit lenses for Sony NEX and FujiFilm X cameras. It also makes the Zeiss Ikon rangefinder film camera and designed and made the Epson RD1 digital rangefinder.”

Production of the Bessa R cameras ceased in 2015 by which time I had sold my R4M but I was interested in re-creating my collection of Voigtlander lenses to use with the Leica T camera that I had bought pre-owned in January 2018 with a Leica 18mm f2.8 L mount lens and an M adapter. Of course the CV lenses would also work well with my Fujifilm X-H1 and X-T20 cameras. But they would of course work best with the full-frame Bessa R cameras and I decided to go for two bodies- the Bessa T and the Bessa R2 – introduced in 2001 and 2003 respectively, with a fairly limited budget.

Bessa T_cr

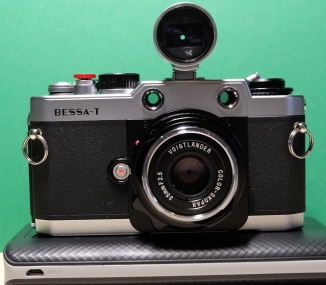
The Bessa T is an interesting camera. This is mine obtained from Richard Caplan (London) pre-owned for £250 with a VM 35mm f2.5 Color-Skopar bought also pre-owned for £254. The finder is a Nippon Kogaku (Nikon) 35-135 Zoom finder that I was lucky enough to find on eBay for £118. The T takes Leica M bayonet mount lenses (or LTM screw lenses with an adapter) and will focus any lens from .9 meter to infinity. The rangefinder has a dioptre adjustment (+2 to -2) and the display is magnified by 15%. The exposure meter display of two red LEDs surrounding one green one is conveniently on the rear of the camera behind the “cold-shoe” because there is no viewfinder and the user has to provide a finder. The Nikon zoom finder has stops for 35, 50, 85, 105 and 135mm but you can set it to any intermediate position. I also have finders for 21/28 and 25mm.

The Bessa range finder cameras have certain advantages over their Leica counterparts. ISO film speeds are 25 to 1600 for the T rising to 3200 for the R2. Flash sync is 1/125 s (Leica 1/50) and top shutter speed 1/2000 (Leica 1/1000). The metal vertical focal plane shutter is more reliable but a lot noisier than Leica’s cloth shutter. There is no Red Dot and the paint and faux leather finish is somewhat primitive. Shutter and ISO speeds for the Bessas are in 1 EV steps; fortunately lens apertures are a minimum of 1/2 EV.

Bessa R2_cr

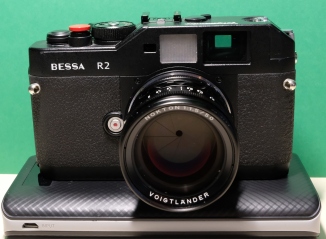
This is my R2 bought from eBay for a rather fancy £499 but it does look as if it has never been used. I’ve mounted a 50mm f1.5 Nokton lens for the photo but it normally has a 50mm f2.5 Color-Skopar while the 50/1.5 is normally used on a Fuji X-H1. This R2 is not quite the same as the R2M. It has the same finder frames of 35, 50, 75, 90 as the R2M but the R2M has a closer minimum focusing distance of .7 meter, a redesigned rewind crank and the R2 top and bottom plates are polycarbonate and not aluminium. The camera takes two LR44 cells for metering, inserted plus side down. When the shutter has been tensioned by winding on the film, a half-press on the shutter release will turn on the metering display at the bottom of the viewfinder display with “-” and “+” surrounding the centre LED for correct exposure. Focusing is achieved by the usual match in the rangefinder patches. The Bessa cameras have very bright finders and focusing is achieved quickly.

One of the things that the Bessa cameras don’t do is through-the-lens flash metering and the Bessa T does not even have a flash-enabled hot-shoe but rather a PC X flash terminal. Because its “cold-shoe” needs to have a finder at all times, you have to use a t-bar to mount the flash. The Bessa R cameras have a hot-shoe for the flash when a separate finder is not required. I use a Metz 36 C-2 automatic flash (£35 pre-owned) that works with lens focal lengths of 28, 35, 50 and 75/85mm and requires three simple settings to produce a balanced output.

These Bessa cameras can only now be bought on the used market. It is quite rare to find good examples in the UK. The largest market is of course Japan followed by the USA. The manual cameras tend to cost more than the A variety. A good R2M would cost the equivalent of £600. The wide angle R4M would be over £675 and a R3M can go for more. But as it is unlikely that Cosina or any other manufacturer will create similar cameras, the Bessas may be the only inexpensive way of shooting Leica M compatible lenses full-frame on a rangefinder camera.

The lenses

I decided to make a collection of Voigtlander lenses with focal lengths of 21, 25, 35, 50, 75 and 90 and quickly discovered that it was not too easy as plenty of other photographers were plainly doing the same thing. I had to buy a new 21mm f4 Color-Skopar but was able to get good pre-owned examples of the others. I deliberately chose the Color-Skopar pancake variations of the 21 to 50 focal lengths as their formula suits my style of photography and is distinctly different to the ambition of lens designers for digital cameras to produce lenses that will be in focus across the whole frame at widest aperture. The C-S lenses are all sharp in the centre from widest aperture till f11 when on a digital body diffraction will cause some softness. If your shot requires centre, edge and corner sharpness then f5.6 or f8 will be your friend although the LTM version of the 50mm f2.5 (my favourite lens) might be pushed to achieve that . Colour and micro-contrast are excellent. Flare is well controlled but don’t ditch the lenshood. Don’t be afraid of apertures smaller than f11 on film. The 75mm f1.8 Heliar takes a bit of getting to know and is a wonderful lens for full-length portraits and the 90mm f2.5 APO-Lanthar (of which I have an earlier LTM screw version) will light up a face with elegance and a slight glow. I will usually have FujiFilm Superia 400 ISO colour print film in the R2 and either Ilford SP2 Super or HP5 Super black and white film in the Bessa T. For something more serious than casual snaps I’ll get the lab to scan the film.

The final lens in the collection arrived earlier this week (from Finland). Perhaps I’m short of a 28mm. I don’t much like the Voigtlander 28mm f2 Ultron but could be tempted by a Color Skopar 28mm f3.5 if one would appear at a good price.

Using wide angle Leica, Voigtlander or Zeiss lenses on digital cameras.

It is a fact that lenses with focal length shorter than 35mm will cause vignetting and colour shift in images when taken with digital cameras. This is largely to do with the angle of light falling on the corners and edges of the sensors in cases where the rear lens element us very close to the sensor but also to the type and thickness of any glass covering the sensor. This can be corrected in the course of processing raw files by software based on the principles of Sandy McGuffog’s original Cornerfix program. This involves using the camera to take raw shots of a plain white background in order to create a file showing only the aberrations and then using that file to subtract the aberrations from the raw files. Adobe Lightroom has a plugin called Flat Field to achieve this. The plugin only works with Lightroom which I don’t use as it is less effective at processing Fuji RAW files than Affinity Photo that is modestly priced for a lifetime licence and is produced in the UK 12 miles away from where I live. Fortunately, Raw Therapee that is a free raw converter contains a Flat Field process and comes with detailed instructions on how to set it up. In order to use either process effectively it is suggested that the adapter used to mount the lenses to the camera do not transmit any information about the lens to the camera. It is also useful to set the focal length of the adapted lens through the camera’s menu so that it comes up in the Exif data. The Flat Field process is so effective once the Flat Field images have been created that I do not recommend any other method even if the camera provides one (which Fuji does). It is also a good idea to keep your flat field files up to date so that the use of the process will also remove any spots in the image caused by dust on the sensor.

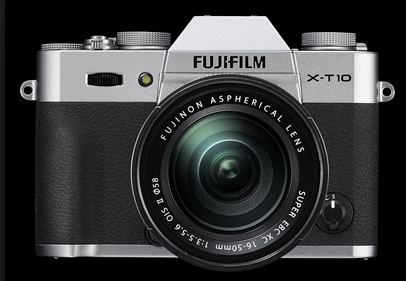
Other than the two Bessa cameras, I have a Leica T which I shoot with an 18mm lens and a Fujifilm setup that I have built up over nearly six years, the present cameras being X-H1 and X-T20.

I bought the Voigtlander 35mm f1.7 and 50mm f2.5 specifically for use with Fuji X-H1 and tests show that although the 35mm vignettes a little there is no significant colour shift and the 50, 75 and 90mm lenses are clean. I don’t intend to use any of the Color-Skopar lenses on the Fuji bodies as wide angles are well covered by my existing Fuji lenses. The Fuji bodies handle manual focus very well.

The Leica T is well suited to the Voigtlander Color Skopar lenses. It has limited customisation options and I recommend that when using adapted M lenses it should be in Aperture mode with ISO set to your preferred flavour of Auto, File Format set to JPG/DNG and Fine and the Left Wheel set to Focus Aid On. Including the JPG will allow you to see whether it is worth keeping. I think the Leica T does a good job on the Color Skopar lenses. For the best results using the wider aperture lenses, the Flat Field adjustment will be a good choice.  As the T has an APS-C sensor (16 Mp), on it the CV primes have an effective focal length of 31.5, 37.5, 52.5, 75, 112.5 and 135mm.


Recipe for a tablet computer

The idea of tablet computers is really quite irresistible. It must be because I’ve been trying to find the right one ever since they were first conceived and the number of discarded ones lurking at the bottom of my stationery cupboard is evidence of failure. It’s not a hardware problem though it would be nice if more of them could be used with a stylus. Basically what is required is a proper operating system – Windows or Linux  for example – together with the very approachable concepts in Android or iOS. As a paid-up Apple-hater, for me it would have to be Windows and Android. While I use Windows for most of my work I find that Android provides me with a better email client and browser and I prefer to use it to read ebooks. It also has some good photographic apps. In the hope that I could install Android on it alongside Windows I bought a Microsoft Surface 3 and every attempt I have made to install any form of Android (including emulators) has failed. 

I am now enjoying getting to know the CHUWI HiBook Pro that does dual-boot Windows and Android. The Android implementation is tailored for the CHUWI hardware and is the 5.1 release which is a couple of years old now but perfectly adequate. Windows 10 Home is a standard installation. The tablet is made of aluminium and is fairly light at 500 grams. It costs less than £200 and I bought mine from Amazon.co.uk. The optional dock keyboard (about £30) is also aluminium and is well designed with two full size USB2 ports and the track pad supports gestures. The 10.1 inch diagonal screen has a resolution of 2560 x 1600 pixels and is really good though it does attract finger marks. It runs an Intel Z8300 quad core CPU with 4Gb of memory and 64Gb of internal storage. There’s a slot for a micro SD card of up to 128 Gb though it’s better to format a 64Gb card as FAT32 so it can be read by both Windows and Android. The internal storage is partitioned 42 Gb for Windows, and 16 Gb for Android. 

Directly compared to a Surface 3, the CHUWI is less well endowed in most areas. It has a better (but slightly smaller) screen, weighs 100 grams less, with a comparable CPU but has only half the internal storage and it doesn’t support a stylus. Its two cameras at 2 and 5 megapixels compare to the Surface’s 3.5 and 8 megapixels. It has quieter and poorer speakers and on battery power it will only last 6 or 7 hours. But it is of course half the price. Where the Surface has a full size USB3 and a mini display port as well as a micro USB charging port, the CHUI has a micro USB port that’s a USB host with an OTG cable, a USB3 type C port that  is also a full USB host and a mini HDMI port.

But in fact there is no real difference between the two machines in normal everyday use and the keyboard for the Surface is particularly poor to use and often for no reason disconnects itself and requires a reboot in order to be recognised again. And the advantage of being able to to switch between Windows and Android on the CHUWI is incomparable.


Panasonic Lumix LX100

Panasonic-Lumix-LX100Panasonic-Lumix-LX100-2

My favourite “general purpose” lens is the Fujifilm XF 16-55 mm f2.8 which on my Fuji X-Pro2 has an equivalent field of view of 24-83 mm. The combination weighs just over a kilo (2.2 lbs) and while that’s fine for specific shoots it would be too much to carry around all day. So a couple of months ago I went looking for something smaller that would offer a similar shooting experience and bought a LX100. When this camera was first on the market in October 2014 it was priced at £799 but the price has fallen to a much more realistic £499.

You can see from the pictures that the LX100 is very much in the idiom of a CSC with a lens aperture ring, shutter speed dial on the top plate and an exposure compensation dial. Since it uses a four-thirds sensor it is not as “pocketable” as the Sony RX100 series but will easily fit in a coat pocket. The lens calls itself Leica Vario-Summilux 10.9-34 mm f1.7-f2.8 and it has optical image stabilisation. The 35mm equivalent field of view is 24-75 mm. The four-thirds sensor is 50% larger than the 1” sensors used in the Sony RX100 series and has 13 megapixels the density of which is to ensure cleaner files at high ISO settings. The electronically controlled shutter has speeds from 60 seconds to 1/16,000 second where the range from 1/4,000 second uses the electronic (rather than mechanical) shutter. That’s a serious specification for a small camera. There is no built-in flash but the LX100 comes with a small external one that slips into the hotshoe.

There is an electronic viewfinder with dioptre control said to have 2,764,000 dots (which is actually 921.000 being the same resolution as the LCD) at 60 fps. Both the viewfinder and LCD have customisable settings for brightness, contrast, saturation and red and blue tints from –5 to +5. I think the viewfinder’s default setting has too much brightness and contrast and could be cooler in hue so being able to alter the parameters is a good inclusion. A tip is to set the Photo Style to Monochrome before altering brightness, contrast and saturation.

The Leica-branded lens really cannot be faulted and compares well with the premium zoom lenses available for dSLRs. Of course it is not only optically corrected, there are software corrections too but they are not overdone.

Being a Panasonic, you get the whole canvas of clever electronic effects; filters, scene modes, intelligent Auto, extended zoom, extensive image parameters and a selection of first-rate movie modes including 4K and Panasonic’s special 4K Photo where you can pick 8 megapixel stills from a 30 fps movie file. Something I had not come across before is the “pinpoint” autofocus mode that gives you an enlarged picture-in-picture showing the result of the focus. Also the ability to disable autofocus on the shutter button so that you can back-button-focus without having to set manual focus mode.

LX100-Q-Disp

My normal shooting procedure is to use the electronic viewfinder, having set the LCD display to the shooting parameters as shown above. The EVF will show the normal shooting display. If you remove your eye from the EVF and press the Q Menu button the parameters on the LCD (with the exception of the aperture and shutter speed) will become “live” and can be altered.

The lens has a 43mm filter ring so fitting an aftermarket lens hood or a variable-density fader is easy. It also opens the opportunity to fit a conversion lens. Panasonic developed a wide-angle converter for the LX5 to use with an adapter. This DMW-LWA52 is still available new and can also be found on the used market for about £70. All you need to mount one on the LX100 is a 43-52mm step ring and you will have a camera with an equivalent focal length of 18-56 mm – highly useful for large interiors.

How (and why) to use the Fujifilm X-T10 in manual mode

Fujifiolm X-T10

This Fujifilm X-T10 is a very competent interchangeable-lens compact system camera with a list price of £599 in the UK with the good 16-50 mm kit lens. I traded in my X-T1 for one as I had issues with the ISO dial that made handling it awkward for me and after a few days I bought another one so that I can use a pair of cameras as I have normally done previously. There are plenty of reviews and blog articles on the web but I am concentrating on the how and why of using it in full manual mode if you have time to do that. In many cases of course you won’t have time to change any settings and have to let the camera do it for you. Luckily the X-T10 has a very fast response time leading to a tiny exposure lag so you can put the camera to your eye, frame the shot and press the shutter button with confidence that you will get at least a reasonable result. Manual mode means setting an aperture, a shutter speed and perhaps a change in sensitivity and although you can press a button to focus you might want to adjust the focus manually as well. It has two advantages. The viewfinder and LCD screen show you precisely what the result will  be and because the shutter button does not focus and meter you have a nil exposure lag. Manual mode is also very good for street work because it helps you set a focus range that makes it easier to get good shots “shooting from the hip”.

To set up the camera for manual operation you first need to go to the Setup menu page 1 and choose Screen Setup and set Preview exp in manual mode to ON. Then click the front dial that defaults to Metering and set either Multi or Center (but not Spot). Then give the front dial a long press and the camera will ask you to choose a function for this button. Choose ISO. Next make sure the lens is not set to Auto and set the shutter speed dial to T. In T mode you control the shutter speed by rotating the front dial; move to the right for a shorter exposure and to the left for a longer one..Finally move the focus  mode dial on the front of the camera to M. When the camera is in M focus  mode and an autofocus lens is  mounted you can obtain instant focus by pressing the AFL button.

If you are in fairly bright surroundings, set ISO to 200, the aperture to f/5.6 and the shutter speed to 1/125 and look through the viewfinder. The bottom row displays the aperture and shutter speed you have set and to the right of these a meter display. Your objective is to use the dials to move the white spot under the meter display to the centre of the display. If you do that, your settings agree with what the camera thinks is the correct exposure. But it may not be the exposure that you want. If you want to avoid blown-out skies, a little under exposure is desirable. It is easy to recover detail from shadows but you can’t recover blown highlights. And perhaps you might want to set a specific white balance rather then just Auto. If in Screen Settings you included the Histogram in the Custom Display you can see how it relates to exposure.

Above the exposure line is the focus line. This shows the distance focused to and the depth of field. The AFL button will effect focus according to your settings. I think that for manual focus it is best to have a single area of the second smallest size available and use it as spot focus. If you had face detection set as the option, change it because it turns off the phase detection sensors. This line demonstrates the relationship between focal length, aperture and depth of field. Using your standard zoom lens, zoom out to shortest focal length (16 or 18), set the aperture at f/11 (changing the shutter speed so that everything is visible) and look through the viewfinder. You will see that the blue area is quite large, especially if you have focused quite far out. Now zoom into the subject. As you do so the depth of field becomes smaller. Zoom out again and start to widen the aperture  from f/11 to maximum aperture and you will see the depth of field grow smaller. One thing to note though is that the X-T10 gives a smaller depth of field than other tools. At 18 mm and f/8 it gives a range 7 to 16 feet but Photo Tools Pro for Android gives 6.6 to 20.2 feet.

Though I don’t do it often, you can use manual mode with an Auto ISO and with the exposure compensation dial. How it works is by relying on the continuous metering in manual mode to produce a meaningful display. Suppose you are moving towards a correct exposure using either the aperture or the shutter speed and the white dot reaches the centre point of the meter display. If you then turn the dial a further notch and the number changes but the dot doesn’t move, you know you have entered an auto range  and you will know when you have exited that range when the dot moves again. But you won’t know the actual ISO selected until the shot has been taken and you see the Exif data. You can use the exposure compensation dial as well but only when exposure is within an auto range. This seemed madness to me until I realised that this would not affect the actual exposure but only the processing of it either in camera or via a tag in the Raw file and then it became quite logical as the change in exposure was reflected in the EVF.

While it is wonderful to see the result in the viewfinder before you take the shot, it is not so wonderful if you use flash in manual mode as if you set an aperture like f/4 and shutter speed of 1/180 you are likely to get a very dark (if not black) viewfinder. In the X-T10 it’s possible to assign Preview exp in manual mode to a function button. I put it on the Movie button. And of course moving to full Auto mode is only a lever flick away

That’s the How. It may sound fiddly and long-winded but is isn’t.  Given relatively even light, there’s an initial setup and then probably only micro-adjustments when shooting in one area. It actually takes very little time to set up manual parameters. You do inevitably get more involved with your subject and that is part of the Why. Seeing the end result before you capture it is a very satisfying process. The EVF and LCD displays have a lot of visual information that helps to avoid mistakes and, unless you are already an expert, helps you learn to take good shots every time.

Manuals and Help files

As a programmer I like to write comprehensive help files and turn them into PDF manuals. People largely dislike reading manuals but what they think a program should be doing is usually what it won’t be. I had been using a free product called HelpMaker until a Microsoft Update stopped it working. So I looked around for a free replacement and found something very similar and free called HelpNDoc but it wasn’t until I had finished the help file in question that I noticed that it put an advert for itself on every page. The only way to get rid of the adverts was to pay £233 for the “Professional” version which was exactly the same as the free one but no ads. I’m used to ads in software (mainly on Android) but it usually costs a maximum of about £7 to buy the ad-free version that usually also has additional functions. So £233, NO WAY. I downloaded PrecisionHelper that decompiled my help file and I used it to remove the offensive HTML code for the ads and recompile it ad-free. “That’ll teach them”, I thought but actually hacking 100 or so help pages does take time and HelpNDoc wasn’t all that good anyway.

I don’t mind paying for software if it’s good and good value. There’s no doubt that RoboHelp and Help + Manual, the two market leaders at $999 and $500 respectively are good but as I intended to make the particular software then I was writing the manual for a free-to-use product these costly helpers didn’t fit the profile. A quick look around Cnet and similar sites revealed many amateur efforts but nothing that sounded good. Then I discovered one of the “Ten best …” guys had a product called Helpinator top of his list a free download and try out for 30 days then pay $150 (currently £98). One can eat that much in an hour even in the rural backwater where I live so I decided to skip a visit to The Lighthouse and acquire it.

A help file creator program can be thought of a hierarchical word processor. Sure, you can do clever things like link parts of a computer program to the help so that the user gets help on where he is, but essentially it’s well suited to writing a book or an academic paper or thesis. Helpinator is written by Dmitry Popov and he has put a lot of thought into making it. Russians do that; my latest oevre credits one American, one German and five Russians for providing tools to get the job done. He also uses uses exactly the same tools as I do to produce his work so he has to be congratulated on his taste as well has his programming. 

I’m writing this article hopefully to introduce Helpinator to you so that you can dump MS Word with its awful “ribbon” and enjoy something made for authoring. You can start Helpinator with an Import module that lets you import a Windows CHM help file, a Windows HTML help project and any HTML, RTF, Text, Doc or Docx file giving wonderful opportunities for plagiarism. The word processor has dictionaries for africaans, american, australian, brazilian, british, bulgarian, catalan, czech, danish, dutch, estonian, finnish, french, greek, italian, hungarian, norwegian, polish, portuguese, russian spanish, swedeish and a technical one plus a thesaurus, so its hard to misspell or choose the wrong word. The word processor creates native HTML and this means that you can load a section into Google Chrome  and get it translated and save it to another folder thus dispensing with the services of a translator who sometimes can hijack your text so that it means something entirely different and you won’t know until it has been published. Google’s translator is getting better daily.

For each publication you can design and use a different template. The ones that come with Helpinator are a quite easy to alter. As you go you can compile your effort into Windows CHM help, Java help, Oracle help, HelpGUI for specific help file purposes, if you are a programmer you can compile it to run directly from programs written in Delphi, C++ or Visual Basic and to normal publishing formats, PDF, RTF, Epub, Mobi (Kindle), web-based help or send it directly to your WordPress blog. Could you ask for more?

Populating a Microsoft Surface 3

Just over a week ago I bought a Surface 3. The 128 Gb / 4Gb RAM variety. I thought it was rather expensive at £499 without the keyboard but then you do get a year’s sub for Office 365 that is worth £60.I guess that most people will add the Type Cover for £110 but I much prefer to use a separate keyboard and mouse and have bought lightweight Bluetooth-enabled versions for £40. I am impressed with the Surface 3. It is faster than I had thought it would be, particularly when writing to the solid state memory. It is well specified: The display is excellent, a full implementation of Windows 8.1 is welcome, the expansion potential is great. I find that the middle position of the built-in stand is ideal for viewing.

With a very high resolution display (1920 x 1280) and small size it is inevitable that display objects can be very small and it is recommended to set a 50% enlargement. I also implement the High Contrast Black theme that produces very clear type and is suitable for most work but it’s easy to change back to a standard display when required. We have an Asus Windows 8.1 tablet with a 10.1 inch screen compared to the 10,8 inches for the Surface 3 and the resolution of that screen is 1368 x 768. That relatively low resolution has no difficulty in running some apps suitable for desktop computers with large displays. However the Surface 3 at full resolution does have problems with a few programs. I have decided to keep the high resolution and use only programs that run well in it.

Microsoft says the Surface 3 can replace your laptop. I guess that many people will be content with what comes with the Surface 3 plus the ability to download free apps from the Windows Store in which case the statement is entirely true. Otherwise it depends on what size and specification your laptop is and what programs it runs. My laptop is a 17 inch variety with an Intel i7 CPU with 12 Gb RAM and it runs some programs that the Surface 3 could not for various reasons. Also my location in a rural area of the UK prevents me from using the “cloud” extensively because I cannot get a fast unmetered internet connection. I do have a fast (4G) cellular metered connection limited to 5 Gb a month (not by money but by my provider refusing to let me have any more) backed up by a too-slow unmetered connection. So what I need in a laptop substitute is relatively abnormal aggravated by my requirement to include a full photographic environment and some programming facilities. But I’m going to try to do it.

I have several email accounts, all of them POP3 that the Windows Mail application doesn’t support so I’m using Thunderbird on all but my Android tablet. Internet Explorer is a good product but I’m using Google’s Chrome because of the number of extensions that are available for it, the synchronisation across devices and the prospect of being  able to run Android apps within it. I know that Windows 10 will have something similar re Android but how do I know whether I will want to  move to Windows 10? And, given that I can’t really use cloud-based services, I need a disc based Office suite that that’s going to be Libre Office. Virus checking comes from AVG free edition, I use PeaZip instead of the Windows archiver because it handles more zip formats. UltraSearch from JAM software finds anything in files. DuckCapture captures graphics including scrolling portions of web pages which the Windows Snipping tool doesn’t. To keep my personal finances in order I use AceMoney that picks up where Microsoft Money left off. You get two licences for £40 so the one for the Surface 3 is essentially free.There’s some good free essentials on the Windows Store including several  music players but the king of these (not in the store) is Spider Player Pro (now free) that apart from playing almost every codec can rip CDs, convert one file type to another, stream radio from the internet and play music with a choice of preset equalisers or you can design your own. It’s worth getting a BeM Bluetooth speaker cube as the built-in speakers are not up to much.

Outside of open source, there are few individuals writing computer programs today. I started doing it professionally in 1986 alongside photography and from 1996 have used the Delphi IDE on Windows. I wouldn’t dream of putting the current Delphi onto the Surface 3. It’s too large and processor-intensive and besides it costs £1,000 now for the entry level version. But there is an open source IDE aptly called Lazarus, built on the Free Pascal Compiler, that succeeds in its aim to produce an environment similar to Turbo Delphi 2006. It looks very good on the Surface 3 in high contrast black.

Photographers are well-supported by Android and iOS apps on smartphones and it’s possible to use the Surface 3 to support the post-capture process though it is better to use a well-endowed desktop computer with at least a 23 inch full HD monitor. Forget about using the camera’s WiFi or EyeFi to transfer the files and get an Inatek USB3 3-port USB hub with an SDXC card slot (£17) and install FlashPipe from ddisoftware. If you already use Flashpipe you can install it free of charge, if not it is $20. When you insert an SD card FlashPipe will automatically install Raw, jpg and video files to your selected folder with your selected file name prefix. Then you need a viewer. IrfanView is good, free, and has lots of plugins already installed. It has comprehensive tooltips to get you started and a very comprehensive help file. It is also good at printing. If you need  more post-processing power, and you should, there is a lot of choice and mine is Corel’s Paint Shop Pro Photo currently in the X7 edition. It rivals Photoshop at only £60 and half that for an upgrade and it runs well on the Surface 3 being much less demanding of resources than Photoshop.You can nominate it as the external editor in IrfanView which makes for good workflow. For Raw conversion/development my personal choice is PhotoNinja but to use it on the Surface 3 you would have to decrease the screen resolution as the menus and icons are deliberately tiny and can’t be resized. There are some resource-hungry Raw converters (Lightroom being one of them) that I can’t recommend for the Surface 3 so I have installed LightZone that is similar to PhotoNinja, lightweight and does a good job on the  Raw files from my Fujifilm and Sony cameras. It also has the virtue of being open source and thus free. If you don’t shoot Raw and do not do extensive post-processing you could probably  get away with just using IrfanView and using Picasa instead of FlashPipe.

If using the Surface 3  without a keyboard/mouse combination I would say that the Pen is a must especially if you are working on graphical images.

From Ricoh Caplio R4 to Panasonic DMC-LF1

Ricoh R4

In March 2006 Ricoh introduced the fourth in its Caplio R series of compact digital cameras. This was a pocketable 6 megapixel camera, priced at £250, with a f3.3-f4.8  lens of 135 film equivalent 28-200 mm and a small 1/2.5 inch sensor. The sensitivity was 64 to 800 ISO then considered state of the art and the sensor provided image stabilisation by micro movement.. A rear live-view panel of 2.5 inches was used as a viewfinder. The camera produced jpeg files and although there was no choice of manual shooting modes, the user could choose manual or auto focus, centre weighted or spot metering, a specific ISO value and a range of values for colour temperature, saturation, contrast, sharpening, white balance. and exposure compensation. There were various scene modes including one to turn trapezoids into rectangles (good if you were taking sneaky shots of papers on someone’s desk) and a macro mode that could focus as close as 1 cm. Without more than a minimum of user intervention the R4 would produce  good shots with faithful colour and wonderful clarity. Being only  95 x 53 x 26 mm in size, it was easy to take everywhere. There were of course disadvantages. From 135 mm equivalent upwards results were not as sharp as at smaller zoom levels. This of course could be handled at the printing stage. or with software. Files at ISO 64 and 100 were noise-free but at ISO 200 a little luminance noise would creep in and shots at ISO 400 in poor light would have chroma noise. ISO 800 proved to be more difficult. Ricoh took the view that it would strike a balance between fine detail and noise abatement. and users could easily treat noise and softness with Ronnie Kroonenberg’s free Picture Cooler software. I had  this little camera  for four years until it slipped out of my pocket into a road drain. The corresponding Ricoh product in August 2010, the CX4, did not appeal and I got a Canon SX210 IS and recently updated to a Canon SX280 HS  after an unsuccessful flirtation with a Sony WX350.

But I am affected by the quality of my two principal cameras – the Fujifilm X-T1 and Sony A7 Mk II – and want more  quality from my carry-everywhere camera where I don’t really want a 20x or 30x zoom but would like an equivalent range of 28-200 mm. My Fujifilm X30 will just about fit into a patch pocket of a jacket but is more comfortable on a neck strap. Ideally I would like a smaller version of the X30 with double the zoom range but it doesn’t exist..

Panasonic LF1

So enter the Panasonic DMC-LF1. This was announced two years ago in April 2013 to use the innards of the DMC-LX7 but with a new Leica-designed 28-200 mm f2.0 – f5.9 lens and adding a small electronic viewfinder. It was thought that it was also a response to Sony’s RX 100 launched in June 2012 with a 28-100 mm f1.8-f4.lens and a 1 inch sensor with 10 megapixels. The 1/1.7 inch sensor of the LF1 is 41% smaller than the RX 100’s sensor but significantly larger than  the 1/2.3 inch sensor customarily used by compact cameras. Panasonic  positioned the camera at launch at $500 or £379 that I felt was rather too high as the specification would indicate some 15% less. It is still (May 2015) available new with a street price in the UK of £225 which represents remarkable value for money. I regard it as a hybrid camera, sitting between the compact “travel zooms” and semi-pro cameras like the Sony RX100 trio. It has full PASM modes with a choice of Raw, Raw + jpeg or jpeg files, two Intelligent Auto modes, Scene and Creative Control modes, four Custom settings modes, and Panorama. There are two control wheels, one around the lens and the other at the rear that is also used as a 4-point pad. There is a Quick menu button and a Function one. And finally there’s one of the best WiFi implementations I’ve met.

There is one outstandingly useful item in the package. The PDF Operating Guide tells you exactly how to do what and unveils the idiosyncratic manner in which some objectives are achieved. It’s definitely worth it to RTFM but not until you have taken a few shots to get a general feel for the camera.

The electronic viewfinder about which many reviewers have been dismissive or just plain abusive is very useful. Its small size and limited definition mean that the camera at 103 x 62 x 28 mm will fit in a shirt pocket. It has quite a high refresh rate and as it is refreshing only 200 pixels there is no lag or tearing. It displays all the information that the 920-dot LCD does including the histogram and level, shows 100% of the frame but for some it may not be really sharp enough to aid precise manual focusing (and the LF1 does not provide focus peaking but you can of course use 1-shot AF in manual focus mode). Pressing the Disp button allows you to cycle through five displays and I would suggest that you go for the one that shows minimal information. In particular the histogram (if you choose to display  it) is less informative in the viewfinder than on the LCD.

For customisation there is only one function button but there is a Quick menu that lets you alter values for exposure compensation, step zoom, aspect ratio, file size, ISO, white balance, AF mode, movie codec and monitor luminance. On pressing the Q button you will be returned to the previous choice but surprisingly the main recording menu does  not work like that. This omission makes using the recording menu more laborious as it is displayed over six pages of four choices per page and there is no quick page access. Moreover most of the choices on pages 1 and 2 are in the Q menu, displaying a lack of logical thought on behalf of the designers. The single customisable function button can be usefully configured to Focus area set, Quality (Raw or jpeg size), AF/AE lock, Metering mode and 1 shot AF. I wonder why Metering mode is not on the Q menu replacing Movie codec, particularly as it is on page 3 of the recording menu. The shortage of customisable buttons is alleviated by the fact that you can save four custom setups. but if for example you assign the function button to 1 shot AF so that you can switch to manual focus and focus with the function button, you can’t invoke AE Lock because there is no second button for it. Many street photographers who would use a camera like this one would like to do that. And one might wonder why exposure customisation is on the Up button of the 4-way pad and also on the Q menu but it’s actually intelligent because if you set manual focus the control ring acts for that and if at the same time you use manual exposure the Up button acts as the switch to let you use the rear command dial to set both aperture and shutter speed.

Many owners of this camera might tend to use Intelligent Auto mode most of the time as it does produce good results and if you want to use flash, Auto mode will give you the best result. There is no flash compensation facility that is sometimes essential in the manual modes. You can choose Intelligent Auto Plus mode that lets you use the Up button to set exposure compensation, background blur and colour temperature. Intelligent Auto mode sets various jpeg processing modes. iHDR will give the impression of greater dynamic range in scenes with great contrast; iExposure will use increased ISO to create a punchy shot, iResolution will create an intelligent digital zoom of up to 2x as well as producing the effect of an increase in the Clarity slider in Raw processing software. iExposure and iResolution are also available as menu choices in the manual modes.

Two of the things that are better than you might expect from this camera are the lens and its image stabilisation. The lens is remarkably good even at the long end. I was able to get a good shot at 200 mm equivalent and 1/8th second – just a little motion blur

Overall I think the LF1 is a good performer. The inclusion of RAW files lets you try to do better than the in-camera jpeg  processing (and with my experience of using Photo Ninja for that, you can).. You can get 810 Raw plus Fine jpeg on a 16 Gb SD card. Having Step Zoom on the Control Ring and normal zoom from the lever by the shutter button is excellent. Movies (I use MPEG) work without nasty surprises,. The Panorama function is as good as anyone else’s. Noise levels are what you would expect from the size of sensor and its population and noise control is a little less aggressive than some of the competition. Finally, whether you use it or not, it comes down to what size prints you could expect to make. I only have an A3 printer so for larger prints I take the advice of Imaging Resource who say in their review that 20 x 30 inch prints look good at ISO 80 or 100, 16 x 20 at ISO 200, 13 x 19 at ISO 400. I would print ISO 800 at 10 x 8, ISO 1600 at 5 x 7 and depending on the subject I might get away with an ISO 3200 print at that size too but certainly at 6 x 4.5.. Recently I’ve taken to making 6 inch square prints and I think I would be happy to print this size at ISO 1600. The extended ISO of 12800 is a step too far and I would tend to avoid ISO 6400 as well.

Leica R lenses on Sony A7 Mk II

The Sony A7 Mk II (ILCE-7M2 for short) full-frame 135 camera with its 5-axis in-body image stabilisation presents probably the best opportunity for using quality manual SLR  lenses for both stills and video. While one could cherry-pick the whole range of SLR lenses, staying with one camera mount’s lenses would mean using only one good adapter and of the lenses available my preference is for the Leica lenses for the Leicaflex and R-series cameras made from 1964 to 2009. Over this 45 year period a great many lenses were produced and there is a plentiful supply of them on the  used market.

What for me distinguishes lenses made by the Leitz factories is the unvarying specification ideals. Lenses would be made to the best mechanical standards out of the best materials. The optical formula for the prime lenses was that at widest aperture the main subject at the centre of the frame would have outstanding clarity and sharpness and in turn this meant that stopping down would achieve sharpness over the entire frame. Colour would be natural with a predilection for slightly cool colour and mildly elevated contrast. Flare would be controlled as much as possible as would colour fringing and above all in the case of prime lenses the subject would be rectilinear within the frame. Of course that’s the ambition of other lens makers too but Leica has always charged enough to allow it to achieve as much of its ideal specification as possible..

24mm f2.8

This is the Elmarit-R 24 mm f2.8. The one I have I  bought in 2014 with a lens hood for £375 which was at the top of my budget. It was made in Germany in 1982 and is in remarkably good condition. At widest aperture it has no distortion but it does have quite heavy vignetting. This is easy to remove in post processing or with Sony’s Lens Compensation app. By f4 it is on the margin of acceptable and by f5.6 it’s gone. For landscape I would recommend using it at f5.6 and for architecture you may want to go to f8. In spite of my copy’s focus ring being rather stiff it is easy to focus and it isn’t necessary to use peaking..


35mm f2

The Summicron-R 35 mm f2 (of which mine is the first incarnation, made in 1970 in Canada) is quite a rare beast. I would have preferred the f2.8 later version because it would have cost me less than £375. 35 mm is a very popular focal length and I had to wait a long time to find one and even then I had to negotiate the dealer down.. It is very similar to the 24 mm having some, but not excessive, vignetting wide open that is gone by f2.8. What is nice about this lens is that you can focus as close as 12 inches and at f11 you will have a depth of field from 6 feet to infinity


50mm f2

The famous Summicron-R 50 mm f2 is a wonderful lens. It is near-impossible to criticise it. My example was made in Canada in 1987 and cost me £299 because it is in almost mint condition.. Condition has a strong influence on Leica  prices as there is a large collectors market. Optically good examples in well-used condition can be had from £185. I used to have a rough-looking one that I used on a Canon body as a second camera for shooting social functions.


90mm f2.8

When you get to longer than 50 mm on full-frame there’s no excuse for distortions on prime lenses. The Elmarit-R 90 mm f2.8 is no exception. My one was made in Germany in 1986 and is a compact and almost mint example that cost me £265 a few years ago. The focal length is preferred for portrait photography (with the “best” lenses from Canon and Nikon being 85 mm f1.2) and I used this one happily for that purpose. If it has a problem it is that it is perhaps too sharp for the current portrait fashion so it is fortunate that it also works well for some types of landscape photography.


135mm f2.8

This lens is basically the same as the 90 mm but at 135 mm the Elmarit-R f2.8 is longer. It has the same characteristics as the 90 mm and in fact I bought both of them together about six years ago and used them on Canon 1DS Mk II. My example of the 135 mm was made in Canada in 1980 and cost £249. While this focal length is primarily good for head-and-shoulders portraits it is also good for indoor sports and concerts. With a 2 x teleconverter it becomes a  270 mm f5.6 and has been getting more use on my A7 Mk II because of the image stabilisation..


These are the five Leitz prime lenses that I have and use with the A7 Mk II. I also use a Canon FD 28 mm f2.8  SC. Before I got the A7 Mk II I already had a Leica 28-70 mm f3.5-4.5 and a  Leitz 70-210 mm f4. The 28-70 was designed and made by Sigma in Japan (mine in 1991). I was able to compare it to the Sony 28-70 mm sold with the camera. I felt that the Leica lens was only better than the Sony in the middle of the range and so bought the Sony “kit” lens with the camera.

35-70mm f3.5 This lens is a Vario-Elmar-R 35-70 mm f3.5. My example was made in Japan in 1982 and cost me £280. It’s known that this is a Minolta design to a Leitz specification and there’s speculation that the actual  build was carried  out by Kyocera. but I think it is more likely that if Minolta subcontracted the build it would have been to Kino Precision. It’s a really nice lens, somewhat richer in colour than the Wetzlar lenses. There is some vignetting at f3.5 that has gone at f4. Having a constant f3.5 maximum aperture is very handy. The zoom ring is marked at 35, 40, 50, and 70 mm and it’s easy to judge the middle points of 37.5, 45 and 60 so setting the focal length for the camera’s IBIS is easy if you stick to these.


70-210mm f4 r

The Vario-Elmar 70-210 mm f4 comes from the same stable as the 35-70 above and mine was made in 1985 and cost £249 two years ago. They say that the later 80-200 mm is better but this is a fine lens. The constant f4 maximum aperture is helpful but you need to go to f4.5 to clear chromatic aberrations and vignetting at 70 mm. As you zoom in vignetting and CA increase and I would recommend going closer to f8 especially at 210 mm. The geometric distortions that bedevil lenses with this focal range are largely absent though there is some pincushion distortion at full stretch. The push-pull zoom and focus ring makes for easy framing and focusing and the barrel is marked with focal lengths 70, 100, 150 and 210.

With the necessity to input focal length to the camera in order to obtain IS, zoom lenses are less easy to use. There is some latitude in the focal length setting but I think that if you need to have IS with a zoom les then you have to pre-set it to an identifiable focal length and this may mean choosing one a little shorter than the one you might arrive at by precise framing so that you have some crop-room. Of course if your target use of the image is to print it then cropping and sharpening naturally falls to be done in the printing process. It’s good to know that the combination of the A7 Mk II and good lenses like these will make a wall display print (taken at base ISO) of 40 x 60 inches!

When buying Leica R lenses you will see a large price difference between the ROM lenses that pass information to the R8 and R9 bodies and the earlier lenses. If you buy a ROM lens you may well get one that has very little wear and tear and has a different lens coating designed for the digital back that was available for these cameras but I don’t think the difference is worth the price. My 45 year-old Leica Summicron-R 35 mm is not as desirable as the new Sony Zeiss Distagon T* FE 35 mm f1.4 ZA because it isn’t auto-focus and is a stop less bright but it would cost me £1,225 more than I paid for the Leica but I bet that if we were to compare large prints or the native resolution displayed on iPads I guess that although there would be a difference it would not be significant..

SONY RX10. An excellent video camera

Sony RX10

Sony ann0unced the Alpha 7 and 7r full-frame cameras along with the RX10 in the middle of October 2013. The two full-frame models had a rapturous welcome but the RX10 had pundits scratching their heads that a bridge camera with a 1-inch sensor should cost $1,300,.£1,050 in the UK.. The problem of course was that word ‘bridge’. Originally that meant a camera with a fixed  zoom lens that resembled a DSLR but it then became a word to describe a camera with a huge zoom range and usually a very small sensor – let’s say a 30-times zoom range with a 1/2.3 inch sensor and costing £250..

The RX10 has a 20 megapixel 1 inch sensor as fitted to Sony’s RX100 cameras (now at Mark III) and the lens is a Carl Zeiss designed 8.3 times zoom with a constant aperture of f2.8 producing a field of view equivalent to 24-200 mm in 35 mm terms in a weather-proof body. Is it beginning to look worth the money? How about the ability to read the whole sensor per frame in video mode and attach a HDMI monitor or connect directly to a video recorder while supporting MP4, AVCHD and XAVC.S formats? And of course it is a very competent stills camera. I think it is well worth the money especially now that the UK price is £650. I bought mine used from my local dealer for £500 in December 2014 with 3700 actuations.

It’s an inescapable fact that Fujifilm’s X-Trans sensor is essentially unsuited to produce video to the standard of the stills obtainable from it. Though I’m by no means a videographer I do like to record video, mainly of live music performances and equestrian events and I can do very basic editing. I’d been using a Fuji X-S1 that has a 2/3 inch EXR sensor which records HD in QuickTime format at 30 fps. Not too bad but it’s very heavy and has a manual zoom whereas I think a hybrid stills/video camera should have a powered zoom with a silent motor, which the RX10 has..

The RX10 has been extensively reviewed and there is a very detailed appraisal from DPReview here. I don’t disagree with the general findings there but given the excellent lens that even at equivalent 24 mm and f2.8 is acceptably sharp throughout the frame and despite the relatively small sensor with a fullish pixel population and Sony’s trademark over-enthusiastic noise abatement, at lowest ISO it will make a good print at 24 x 36 inches dropping to 10 x 14 at ISO 1600 and 4 x 6 at ISO 12800 from out of camera jpegs. Compare this to the Fuji X-T1 with a sensor 3 times larger and 20% fewer pixels that will match the print size for its lowest ISO and drop to 14 x 20 at ISO 1600 and 5 x 7 at ISO 12800 and you see what a creditable performance the Sony RX10 achieves.

RX10   llilli

Here is the RX10 with the Lilliput field monitor that I used with my Canon 5D Mk II. It’s a fairly inexpensive 7 inch monitor and it will run off a 12v DC source or a battery.I use Canon LP-E6 and you can get adapters to take other types. The monitor comes with a hood to use outside in sunlight. The RX10 has a menu item to select whether you want also to display shooting parameters and of course you can select which of these are to be displayed. I always try to film from a tripod with a decent pan and tilt head but if this isn’t possible the RX10 has a stabilisation menu item that tries hard to  keep the frame stabilised.

Pressing the Red Button will start recording video if the MOVIE Button option in the Custom menu is set to Always. In fact it’s the only way to record video in Auto mode, otherwise you should be in one of the PASM modes to be able to alter settings. During the recording the Menu and Function buttons don’t work so you should set up the Custom Keys for what you want to alter on the fly. For example you might set AEL to AEL Toggle, C to AF/MF focus toggle,.the command wheel to ISO, the right button to audio record level, the left button to Focus magnification, and the down button to Lock-on AF. It’s a matter of taste whether you use manual or auto focus. AF is always continuous focus and many people prefer manual.

You have to use the zoom ring on the lens to focus and this has two disadvantages the first being trivial but annoying in that Sony insists that anticlockwise moves focus towards infinity and the second being that the ring is geared so that a quick movement can be imprecise and a precise slow movement may take longer than you wish. Sadly, allocating AF/MF Focus Hold to the centre button so that it would spot-focus and return to manual focus does not work when continuous focus is the default.  Zooming, in manual focus mode, has to be done with the lever around the shutter button and in video mode it is geared (as it probably should be) to slow fluid movements making it impossible to ‘snap zoom’. I had high hopes of Smart Teleconverter but it doesn’t work in video mode. Nevertheless Sony has made efforts with the focus and zoom gearing to please more people than it will annoy.

The RX10 has Sony’s Creative Styles and all of these can be used in video mode along with all but about 6 of the Picture Effects but the only way to get the Scene modes is to select Auto mode. I know many people who will use manual mode with Auto ISO. Often my preference is for manual mode with a fixed ISO to capture the variation in light. A mixture of continuous AF and manual focus can be interesting..It’s the fact that the RX10 can handle all these that makes it such a good tool for video.

And it’s no slouch either as a stills camera. The motorised zoom makes it a little slower in operation than a mechanical one but the step zoom option is extremely useful. It is compact and very nicely weighted and the weather-proofing is a  bonus. So also is the close focusing distance of 3 cm at wide angle and only 30 cm (1 ft) at telephoto. The ClearImage digital zoom does effectively stretch the range to 400 mm. The camera would be well suited to an urban environment as well as to the bush and on safari and I wish I had had it on our last visit to India.

Fuji X system lens choices

It takes guts for a camera manufacturer to introduce a new camera with only prime lenses available for it but that’s what Fujifilm did in January 2012 when it introduced the X-Pro 1. Early adopters had a choice of 18, 35 and 60 mm lengths, translating into 27, 53 and 90 mm in 35 mm film terms. For older photographers like me it seemed quite natural as this was the choice we got if we were lucky in the 1970s. But I was not an early adopter and waited until the X-E1 was available and bought it with the 18-55 mm ‘kit’ lens in November 2012.

Now in January 2015 I have two X-E2 bodies and one X-T1 body and these are my principal cameras, having traded in a Canon 5D Mk II with a pro lens collection, retired from paid work and built up a lens collection that suits my style of photography and the different complexity and weight of kit required for aspects of it. Fuji now has 18 lenses available for the X system and these can be divided into classes like airline seating as Economy, Premium Economy, Business and First. Economy represents the XC entry level zoom lenses, Premium Economy is the next level of zoom lenses and simpler prime lenses, Business class is for more specialised and ‘pro’ zoom lenses together with the best non-specialised prime lenses and finally First is the super-class for the specialised prime lenses such as the 56 mm f1.2 R APD.

I’ll start from the bottom with the zoom lenses but it’s important first to look at the design concepts of X system zoom lenses. Since the creation of the micro Four Thirds standard it has been an accepted part of lens design that in addition to optical control of distortions there would also be control in firmware which would not only affect in-camera jpeg files but also tags in a Raw file so that the default development of the raw image  would reflect the corrections applied and since the electronic viewfinder would also show the effect of the corrections these would largely be concealed from the user. Historically, a well-behaved zoom lens of more than two times magnification would have barrel distortion at the wide end and pincushion distortion at the telephoto end; the more magnification in the lens usually produced greater distortions. In this respect I remember being disappointed that the expensive Canon 24-105 mm f4 L required post-processing to remove distortions at 24 mm. While correction of barrel distortion consists of “pulling out” the corners of the image that has no significant adverse effect on the edges, to “pull out” a pincushion distortion will affect the centre of the image that can soften the centre at the pixel level. For a lens with maximum optical correction this will normally be imperceptible in prints  but I do notice when pixel peeping that the edge sharpness of the XC 16-50 mm lens at 50 mm and widest aperture is greater than the centre sharpness, though this is reversed when the lens is stopped down.

Four fuji lenses

Here is a picture of four XF zoom lenses. From the left 18-55, 10-24, 18-135 and 55-200. The 18-55 and the 55-200 fall into Premium Economy while the 10-24 is definitely Business Class and the 18-135 just about joins it there.  The 18-55 is reasonably light at 310 grams (11 ounces) and has an aperture range of f2.8 to f4. The 55-200 is the largest and heaviest at 580 g (20 oz) and is f3.5 to f4.8. These are the “standard zooms” and you can have a 35 mm equivalent range of 27-300 mm if you use two bodies. These are distinguished by solid construction, an aperture ring and claimed optical stabilisation of 4 stops. I own both and they are excellent performers. The 18-55 is good at 18 mm wide open, better at f4 and incredibly sharp and punchy at f5.6. It’s more or less the same at 35 mm (though not as good as the 35 mm prime lens). At 55 mm you will find that the edges are a bit soft at f4 and would be best at f8. If you do shoot double-handed, use the 55-200 at 55 mm  where that lens has a stellar performance. At 100 mm, while good at f4 it improves considerably at f5.6. At 200 mm one expects such a lens to be less good but it keeps up its performance at a slightly lower level and f8 is its “sweet spot”. Both of these lenses suffer from diffraction after f16 on the X-Pro 1 and X-E1 but the X-E2 and X-T1 have the option of Lens Modulation Optimiser that allows the use of small apertures with less degradation.

The X-M1 and X-A1 were introduced with the XC 16-50 and XC 50-230 lenses and are now in version II.  I have experience of them in the original version. The 16-50 mm f3.5 to f5.6 is smaller and 115g lighter than the 18-55, lacks the aperture ring, has a plastic rather than metal mount and construction, slightly less efficient stabilisation and a different optical recipe. These differences also apply to the 50-230 mm f4.5 to f6.7 which is 205g lighter. But they have distinctive differences. The 24 mm equivalent wide angle on the 16-50 is rather tempting as is the 45 mm equivalent longer reach of the telephoto zoom. Despite the lower specification the 16-50 is a good performer turning in acceptable results throughout, though to get the best you need to stop down to f5.6 at the wide end to f8 at 50 mm. I would certainly use this lens for holiday shots and whenever lightweight kit is required. The XC telephoto lens is not so versatile, requiring perhaps an additional stop down for the best result. But of course the ‘best result’ being equivalent focus across the frame is only required in some circumstances and often a more pictorial result can be achieved by allowing softer corners and edges. These XC lenses have the benefit of a significant price difference as well.

The 10-24 mm f4 zoom lens is, I think, an absolute must to own for architectural photography and any other genre requiring ultra wide angle rectilinear performance. I thought my Sigma EX 12-24 mm f4.5 to f5.6 for Canon full frame was excellent but this Fuji lens blows it away in every department. It is excellent overall but excels in the range 14 to 20 mm where the definition and clarity is amazing. Though expensive, even now its best UK price is £750, it is very good value for money. I was able to compare it with the XF 14 mm f2.8 at f4 and could hardly tell the difference and it beats a Leica R 24 mm f2.8 at f4 on  a Sony A7. I do not have the XF 23 mm f1.4 but reviews indicate that the prime beats this zoom at f4. At 18 mm it is significantly superior to the 18-55 and the little 18 mm f2 prime at f4. It is fairly heavy at 410g (14 oz) and significantly  larger than the 18-55 lens.

If you look at a pairing of the 18-55 (or maybe the 16-50) with the 55-200 (but perhaps not the 50-230) as a “cover the range” zoom system, by spending more and carrying more weight you can go for overkill with the 10-24 paired with the 18-135 mm f3.5 to f5.6 OIS WR at a current price of £1,350 for the two if them (that’s 40% of the current price of one Leica M 35 mm f1.4). You might be prepared  to change lenses on one X-T1 body because it’s unlikely that you would need to do so with this pair out in the field. The effective 35 mm range of 28-200 mm has been tried by every manufacturer over the years and it has usually been a disappointment to the user. They were fairly poor at each end and OK in the middle but subject to flare and chromatic aberrations. This one manages to do it very well. Fuji has obviously aimed at replicating as much as possible the profile of the well-received 55-200 mm and has succeeded with that except for less good edge sharpness at 135 mm which will improve a lot when stopped down by one further stop to f8. The optical profile here has been formulated to limit pincushion distortion in order not to have to apply severe correction in firmware. Centre sharpness is good to excellent throughout with the best balance of centre and edge sharpness being achieved in the middle of the range which is where i want it. The optical stabilisation is quoted as good for 5 stops and it must be thereabouts as I have managed to get steady shots at 1/15th at the wide end and 1/30th at max telephoto when unstabilised one would want 1/150 at least.

While on zoom lenses, the two most recent are the ‘Pro’s Perfect Pair’. These are both f2.8 constant aperture, water-resistant and designed for the X-T1. The 16-55 mm (24-83 mm equivalent) is not optically stabilised in order to reduce size and weight and the  50-140 mm (75-210 mm equivalent) is optically stabilised. These two premium lenses cost  £900 and £1,100 respectively and are very desirable. But I’ve ‘been there, done that’ with Sigma lenses in Canon fit and am content to stay in  my Premium Economy seat with the 18-55 (or the 16-50) and the 55-200. For a working pro I’m certain that the f 2.8 lenses would be ideal and pay back rapidly. On the lens roadmap for end 2015 is a ‘super-telephoto zoom’.

There are  seven prime lenses with two more coming relatively soon. In ascending focal length these are 14, 18, 23, 27, 35, 56 and 60 with 16 and 90 to come. In my view the 14 and the 18 are covered by the 10-24 zoom. This could be a brutal decision for the 14 that does have an edge in clarity and is a beautiful object on its own account. The others are not in any way bested by zoom lenses at the same focal length.

The 23 mm f1.4 is an excellent lens and if a 35 mm equivalent field of view is a favourite then I think it should be a ‘must have’ even though it is somewhat pricey at £650. I prefer the 40 mm FOV so I favour the 27 mm pancake lens. However I was intrigued by the SLR Magic 23 mm f1.7 manual focus lens which I have and have reviewed earlier in this blog. Its main strength is the attractive out-of-focus area (Bokeh). The 27 mm f2.8 is very similar to the Panasonic 20 mm micro 4/3 lens except that it has more contrast and a character of its own. On a smallish body like the X-E2 it works well for street work in manual focus mode using AFL to set focus and using manual mode at say 1/100 and f5.6 with auto ISO at max 3200. Don’t miss the 35mm f1.4! It’s a magic lens. It collects more light than it has a right to and you will quickly find it to be an old friend.

The 60 mm f2.4 is an interesting lens because it will focus closely and reach 1:2 macro. Add an extension tube and it will do 1:1 macro. It also does very well as a portrait lens. When it came out with the X-Pro 1 the autofocus was slow but focusing has improved dramatically with the X-E2/X-T1. I like the 60 mm a lot and even shoot landscape with it. It has been described as sometimes too sharp for portraiture – a somewhat back-handed compliment. It has though become eclipsed by the 56 mm f1.2 that is a direct competitor to the revered Canon 85 mm f1.2 L. I found a  blog report of a shootout here that is worth reading. This lens definitely goes into the First Class; for what it is it is quite modestly priced at £800 with the version that has the Apodizer filter at £1,100 and although I would love to have it, I don’t think it would get a lot of use and in any case I’m saving up for the 16 mm f1.4 that is due to arrive in the Spring. Why f1.4 when f2.8 is good enough for everybody else? Wait and see. Also for later this year is a 90 mm f2 that will be interesting. though I shall pass on it as I have a Leica R 90 mm f2.8.